
Contents
- How to Safely Disconnect a Car Battery Without Frying Your ECU
- Before Disconnecting the Battery
- How to Safely Disconnect a Car Battery
- Correct Battery Terminal Order
- What Happens to ECU Settings?
- Using an OBD2 Memory Saver
- How to Clean Corroded Battery Terminals
- Does a New Battery Need Registration?
- How to Reconnect a Car Battery
- Common Mistakes
- When to Call a Professional
- Frequently Asked Questions
- Which battery terminal should be disconnected first?
- What happens if I disconnect the positive terminal first?
- Can a 12V car battery shock you?
- Can I disconnect only the negative terminal?
- How long can a battery stay disconnected?
- Does disconnecting the battery damage the ECU?
- Does a replacement battery need registration?
- The Rule to Remember
How to Safely Disconnect a Car Battery Without Frying Your ECU
To safely disconnect a car battery, remove the negative terminal first. Remove the positive terminal only after the negative cable is fully isolated.
When reconnecting:
Disconnect: Negative first. Positive second.
Reconnect: Positive first. Negative last.
Most vehicles use a negative-ground electrical system. The negative terminal connects to the chassis and engine block.
Removing it first breaks the return path through the vehicle’s metal body. Your wrench can then touch bodywork while loosening the positive clamp without completing a circuit through the battery.
Remove the positive terminal first and the risk increases. If the wrench touches the positive post and grounded metal together, it creates a high-current short circuit.
That can cause sparks, burns, melted metal or battery damage.
Safety scope: This guide covers conventional 12-volt automotive batteries. It does not cover hybrid or EV high-voltage traction batteries. Never touch orange high-voltage cables without proper training and protective equipment.
Tools and Safety Gear
You will need:
- Correct-size wrench or socket
- Safety goggles
- Protective gloves
- Zip tie or insulated cable tie
- Clean shop rag
- Vehicle owner’s manual
For corrosion or battery replacement, you may also need:
- Battery-terminal brush
- Baking soda and warm water
- Battery-terminal puller
- Terminal covers
- Compatible 12V OBD2 memory saver
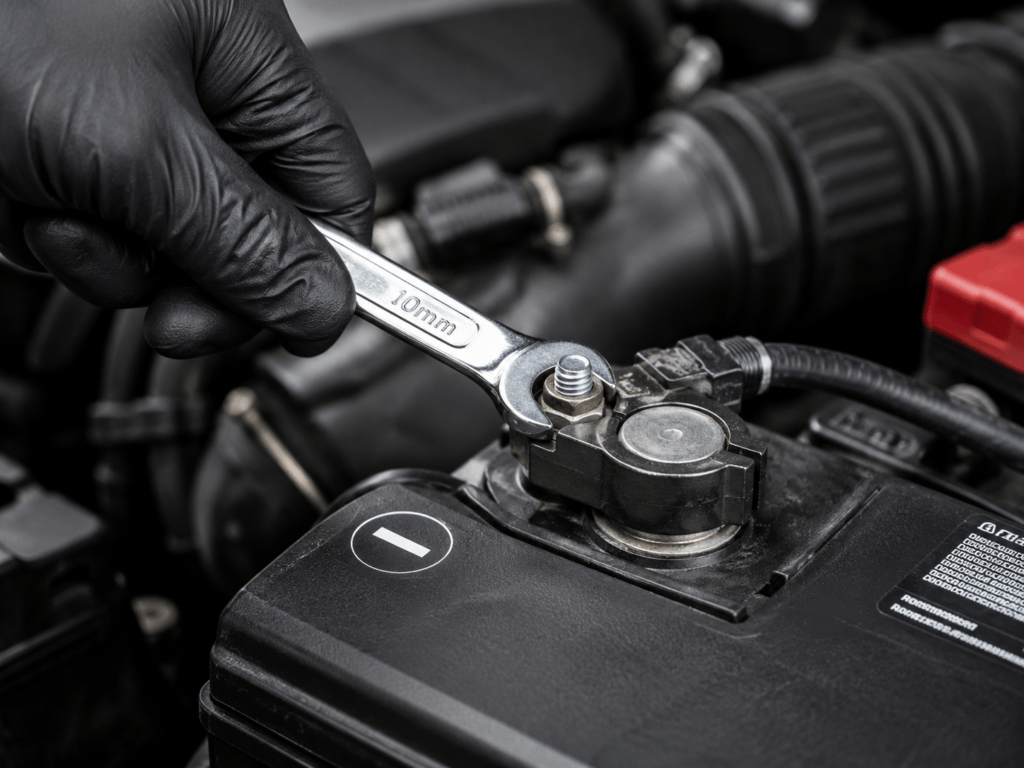
A 10 mm wrench fits many battery clamps, but not all. Some vehicles use 8 mm, 12 mm, 13 mm or model-specific fittings.
Use a tool that fits securely.
Before Disconnecting the Battery
Park on firm and level ground.
Apply the parking brake. Select Park in an automatic vehicle. Secure a manual vehicle in first or reverse gear.
Switch off all electrical equipment, including:
- Headlights
- Climate control
- Radio
- Dash camera
- Phone chargers
Remove the ignition key.
For a push-button vehicle, move the key fob away from the car. Some vehicles wake control modules when the fob approaches.
Open a window before removing power. This prevents accidental lockout.
Remove rings, watches and metal bracelets. Wear goggles and gloves.
Keep flames and cigarettes away from the battery. Do not lean directly over it.
Let Modern Cars Shut Down
Control modules may remain active after the ignition is switched off.
Wait several minutes before disconnecting the battery unless the owner’s manual gives a specific shutdown time.
Avoid opening doors, pressing the key fob or operating switches while waiting.
Stop If the Battery Is Damaged
Do not continue if you notice:
- A swollen or cracked case
- Fluid leakage
- Smoke or hissing
- A strong rotten-egg smell
- Melted terminals
- Heavy heat damage
- A frozen battery
- Unexplained sparking
Do not handle a leaking, swollen or overheating battery. Contact a qualified technician.
If the battery looks normal but the engine cranks slowly or needs repeated jump-starts, check these dead car battery symptoms before replacing it.
How to Safely Disconnect a Car Battery
Step 1: Locate the 12V Battery
Most batteries are under the hood, but some are located:
- In the trunk
- Beneath the trunk floor
- Behind trim
- Under a seat
- Beneath a protective cover
Some vehicles have remote jump-start posts under the hood.
Do not use a remote jump post as the disconnection point unless the manufacturer specifically instructs you to. Locate the actual battery.
Step 2: Identify the Terminals
Look for the markings on the battery case.
The negative terminal normally has:
- A minus symbol (–)
- A black cable
- A cable leading to the chassis or engine
The positive terminal normally has:
- A plus symbol (+)
- A red cable or cover
- A cable leading toward the fuse box or starter
Never rely on cable colour alone.
Always confirm the + and – symbols before using a tool.
Step 3: Remove the Negative Terminal First
- Confirm the ignition is off.
- Find the terminal marked –.
- Loosen the clamp nut.
- Hold the metal clamp, not the cable.
- Rotate it gently from side to side.
- Lift it straight off the post.
- Move it away from the battery.
- Secure it with a cable tie.
Do not leave the cable loose. It can spring back onto the terminal.
Never:
- Pull on the cable insulation
- Pry under the clamp with a screwdriver
- Hammer the battery post
- Twist the post aggressively
- Bridge both battery posts with a tool
Use a terminal puller if the clamp is seized.
Step 4: Remove the Positive Terminal Second
Once the negative cable is fully isolated:
- Open the positive-terminal cover.
- Loosen the positive clamp.
- Lift it from the post.
- Secure the cable away from the battery.
- Cover the exposed positive post.
The vehicle is now disconnected from the battery.
The battery itself is still energized. Never bridge the positive and negative posts with a metal object.
Step 5: Remove the Battery
When removing the battery completely:
- Disconnect the vent tube if fitted
- Remove the hold-down bracket
- Clear the cables
- Keep the battery upright
- Lift it using the handle or a battery strap
Never lift a battery by its terminals or cables.
Correct Battery Terminal Order
| Operation | First Terminal | Second Terminal |
| Disconnecting | Negative (–) | Positive (+) |
| Reconnecting | Positive (+) | Negative (–) |
Negative goes away first and comes home last.
What Happens to ECU Settings?
Disconnecting a battery can reset some vehicle settings, including:
- Clock and radio presets
- Seat and mirror positions
- One-touch windows
- Sunroof calibration
- Steering-angle calibration
- Idle and transmission adaptations
- Stop-start availability
- Emissions readiness monitors
This does not normally damage the vehicle.
Some systems relearn automatically after driving. Others require a manual reset or diagnostic tool.
Mileage and immobilizer programming are normally stored in non-volatile memory and are not erased by a routine battery disconnection.
Using an OBD2 Memory Saver
A 12V OBD2 memory saver provides low-current backup power while the main battery is disconnected.
It can preserve many convenience settings during a battery replacement.
Basic procedure:
- Confirm compatibility with the vehicle.
- Switch off all accessories.
- Connect the memory saver to a charged source.
- Plug it into the OBD2 port.
- Confirm that it is working.
- Disconnect the battery normally.
- Avoid opening doors or using electrical equipment.
- Reconnect the battery.
- Remove the memory saver after both clamps are secure.
When Not to Use a Memory Saver
A memory saver keeps parts of the vehicle electrically live.
Do not use one when working on:
- Airbag or SRS wiring
- Starter or alternator cables
- Main fuse boxes
- ECU power circuits
- Damaged wiring
- Short-circuit diagnosis
- Vehicle welding
- Repairs requiring complete electrical isolation
A small memory saver cannot power headlights, blowers, power seats or other high-current systems.
How to Clean Corroded Battery Terminals
Battery corrosion normally appears as white, blue or green deposits.
It can make a clamp difficult to remove and increase electrical resistance.Loose or corroded battery connections can also trigger a Battery Saver Active warning on some vehicles.
Wear goggles and gloves.
Disconnect the battery before cleaning whenever the clamps can be reached safely.
If corrosion blocks safe access, or the battery is damaged, contact a professional.
Baking-Soda Method
- Mix one tablespoon of baking soda with warm water.
- Apply a small amount to the external corrosion.
- Let it fizz briefly.
- Scrub gently with a terminal brush.
- Wipe away the residue.
- Rinse with a small amount of clean water.
- Dry completely.
Do not pour the solution into battery vents or nearby electrical connectors.
If the clamp remains stuck, use a battery-terminal puller. Do not hammer or pry it off.
Does a New Battery Need Registration?
A temporary battery disconnection does not normally require registration.
Battery registration may be required after installing a new battery in a vehicle with intelligent charging or a battery management system.
Manufacturers may call this:
- Battery registration
- Battery adaptation
- Battery coding
- BMS reset
- Battery-sensor reset
The requirement depends on the vehicle’s make, model, year and charging system.
Changing battery chemistry or capacity may also require coding.
Skipping a required reset can cause:
- Incorrect charging
- Reduced battery life
- Stop-start faults
- Battery warning messages
- Incorrect state-of-charge readings
Battery registration cannot fix excessive charging voltage. If the battery becomes hot, swells or develops a burning smell, check for alternator overcharging symptoms.Battery registration is different from relearning windows, steering angle or idle settings.
Check the owner’s manual before replacing the battery.
How to Reconnect a Car Battery
Reconnect the battery in reverse order:
Positive first. Negative last.
Step 1: Inspect the Battery Area
Before reconnecting:
- Remove tools and loose metal objects
- Check the cables for damage
- Confirm the terminals are clean and dry
- Secure the battery hold-down bracket
- Reconnect the vent tube
- Check that no cable is trapped
Step 2: Connect the Positive Terminal
Place the positive clamp fully over the positive post.
Tighten it until the clamp cannot rotate by hand.
Do not overtighten. Excessive force can damage the clamp, post or battery seal.
Refit the terminal cover.
Step 3: Connect the Negative Terminal
Clear all tools from the area.
Place the negative clamp over the negative post and tighten it securely.
A tiny single spark may occur as low-current modules power up.
Stop if:
- The spark is large
- Arcing continues
- The cable becomes warm
- Smoke appears
Large or sustained sparking can indicate an active electrical load, incorrect connection or electrical fault.
Step 4: Reinitialize the Vehicle
After reconnecting:
- Switch the ignition on without starting.
- Allow the system checks to finish.
- Start the engine.
- Check the dashboard for warning lights.
- Reset the clock and radio.
- Test the windows and central locking.
- Follow any manufacturer-specific relearn procedure.
Scan the vehicle if warning lights remain.
Common Mistakes
Avoid:
- Removing positive first
- Trusting cable colour without checking symbols
- Leaving the key fob near the vehicle
- Pulling on the cable instead of the clamp
- Letting a loose cable touch the post
- Using the wrong-size wrench
- Overtightening terminal clamps
- Using a memory saver during isolation work
- Forgetting the hold-down bracket or vent tube
- Skipping a required BMS reset
When to Call a Professional
Get professional help if:
- The battery is leaking or swollen
- The terminals are melted
- The battery is under a powered seat
- Airbag wiring must be disturbed
- The vehicle has multiple 12V batteries
- Corrosion has damaged the cable
- Battery coding is required
- The vehicle needs a special isolation procedure
- Heavy sparking occurs
- Warning lights remain after reconnection
Frequently Asked Questions
Which battery terminal should be disconnected first?
Disconnect the terminal marked with the minus symbol (–) first. It usually has a black cable, but always confirm the battery markings.
What happens if I disconnect the positive terminal first?
Removing it does not automatically cause damage. The danger occurs if the wrench touches the positive terminal and grounded metal simultaneously. This creates a high-current short circuit.
Can a 12V car battery shock you?
A 12V battery is unlikely to cause a serious electric shock through dry skin. The main risks are burns, sparks, molten tools, battery acid and hydrogen ignition.
Can I disconnect only the negative terminal?
On many conventional vehicles, removing and securing the negative cable is enough for basic 12V maintenance. Follow the repair procedure for the component being serviced.
How long can a battery stay disconnected?
There is no universal limit. Some settings reset immediately while non-volatile data remains stored.
Use a compatible memory saver when preserving settings matters and complete isolation is not required.
Does disconnecting the battery damage the ECU?
A correct battery disconnection does not normally damage the ECU.
Damage is more likely from reversed polarity, direct short circuits, voltage spikes or improper jump-starting.
Does a replacement battery need registration?
Some modern vehicles require battery registration or a BMS reset after a new battery is installed. Check the manufacturer’s instructions for the exact vehicle.
The Rule to Remember
Disconnect: Negative first. Positive second.
Reconnect: Positive first. Negative last.
Use the correct tool. Secure disconnected cables. Keep metal objects away from the battery posts. Follow model-specific instructions whenever they differ from general guidance.